


|
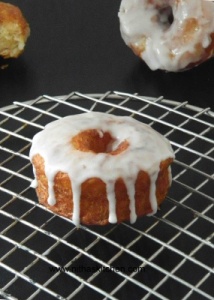
Crouu-Doughnuts | Kronuts
Posted By : Sangeetha Priya
Blog Link : http://www.nithaskitchen.com
Category |
: With Egg |
|
|
Ingredients
Short Description I First day makes dough Day 1/Ingredients for dough All purpose flour - 3 Cups/510grams + more for dusting the work table Sugar - 1/2 Cup/100grams Milk - 1/2 cup/150grams+2 Tbsp (I used 2% milk) Eggs - 2 Jumbo Size (If you are using large eggs use 3) 50g/ 3.5 tablespoon unsalted butter Rapid rise Yeast/ Active dry yeast/ instant yeast - 1 packet (Or) 2 ¼ tsp (I went for Active Yeast) Salt - 1tsp/7grams II Second day incorporate/laminate butter into the dough Day 2/For butter layer Ingredients Unsalted butter - 1 n 1/4 Cup/295gms+1/2 tablespoon (2 sticks and little more than a ½ stick) (If you can find European style butter like pluegra that will be good) III Third day fry the dough/Crouu-doughnuts/kronuts Ingredients Canola oil: 2-4 cup Water: 200 g for brushing on the top Cinnamon sugar (400g sugar and 100g cinnamon, I skipped this)
Method
Day 1/Dough Preparation Keep 50 g butter and eggs at room temperature 30 minutes before dough preparation. Combine the dry ingredients —flour, salt, sugar in the wide bowl/bowl of stand mixer (Pic 1). Heat milk to microwave for high for 30 seconds and add butter that way butter melts well (Pic 1). When milk butter is lukewarm add yeast to it and give a nice stir (Pic 1). Then to the dry mixture add butter milk mixture and eggs. Knead well with your hand make for about 10-15 minutes(Pic 2) or until you get smooth shiny dough. Remove the dough and tuck under edges to form a ball. Coat a bowl with any oil of your choice and place the dough in it with seams down. Cover tightly with clear plastic wrap, making sure it is in contact with the dough. Place dough in a warm area and allow it to double in size (Pic 3). This should take 60 minutes. Once dough has “proofed, or double in size ” transfer to refrigerator to overnight (In sealed bag). When cooled in refrigerator it sets well (Pic 4). Notes If using fresh yeast, mix with room temperature milk beforehand to activate yeast. If using stand mixer mix on low speed for 3 minutes, or until everything is incorporated. Mix on higher speed for another 8 minutes. Day 2/How to Pound the Butter for puff pastry Next day start incorporating the butter to the dough. Cut the cold butter 295g lengthwise into 1/2-inch-thick slabs. Arrange the pieces on a piece of parchment or waxed paper to form a 5- to 6-inch square, cutting the butter crosswise as necessary to fit (Stepwise Picture 1 below). Top with another piece of parchment or waxed paper (Pic 2). With a rolling pin, pound the butter with light, even strokes. As the pieces begin to adhere, use more force. Pound the butter until it’s about 4 x 6 inches square and then trim the edges of the butter (Pic 2). Put the trimmings on top of the square and pound them in lightly with the rolling pin. Adjust the squares using knife and don't handle with hand (Pic 2). Place in refrigerator to cool for at least 2 hours. Flour the area well so that dough won’t stick. Laminate the dough Unwrap and lay the dough on a lightly floured work surface. Roll into a 10-1/2-inch square,Brush excess flour off the dough. Remove the butter from the refrigerator, If not, refrigerate a bit longer. Unwrap and place the butter on the dough so that the points of the butter square are centered along the sides of the dough. Fold one flap of dough over the butter toward you, stretching it slightly so that the point just reaches the center of the butter. Repeat with the other flaps, then press the edges together to completely seal the butter inside the dough (A complete seal ensures butter won’t escape). Prick with fork if you see any air bubbles while working with dough. 1st Turn Lightly flour the top and bottom of the dough, Add flour whenever needed. With the rolling pin, firmly press the dough to elongate it slightly and then begin rolling instead of pressing, focusing on lengthening rather than widening the dough and keeping the edges straight. Turn the dough so that a shorter end faces you (Pic 3). Roll to expand the length of the dough, making sure that the dough doesn’t stick to the table (Pic 4). When you have a rectangle about 21 x 9 inches (Pic 5), fold the top third of the rectangle down (Pic 6) and fold the bottom third up to cover it (Pic 7). Turn the dough 90 degrees so that the opening resembles a book (Pic 8). 2nd Turn. Try to do this turn right away, but if the dough is too warm, wrap in film and place in the refrigerator until it cools. Repeat rolling, just like the first turn, then turn 90 degrees and gently press two fingers into the lower right corner to mark the number of turns. (Marking the dough allows you to track your progress, and ensure that the orientation of the dough is correct when you remove it from the refrigerator.) Cover the dough in a parchment paper and then again with plastic wrap and refrigerate for at least 1 hour. 3rd Turn. The dough will be hard, so gently pound the dough to warm the butter. If it is too cold the butter will separate and not spread as it should. Repeat the previous steps, and turn again, marking the corner with three fingerprints. Cover dough with parchment paper and plastic wrap and refrigerate for 1 hour. 4th Turn. Make the final turn, repeating the steps from turns 1-3. Refrigerate overnight. Note Don’t over work with dough with too much kneading, Don’t over work with butter, if butter starts to leaking, try to put it back in the refrigerator. Day 3/How to Roll and punch the Dough Lightly dust a work surface with flour and roll out the dough to approximately the size of a sheet pan, 1/2 inch thick. Make sure the dough stays cold, without sticking to the surface. If it starts to stick, place in the refrigerator and roll again when cool. Transfer to a sheet pan with parchment paper, cover with cling film and chill before punch it. Prepare a sheet pan with parchment paper, sprayed with PAM or oil. Remove dough from fridge and take two ring molds, approximately outer molds should be 3 ½ inch and inner should be 1 ½ inch. (use you peanut bottle cap for outer mold and prescription medication bottle for inner ones) . Only start punching if the dough is very cold (Stepwise Pic 1 below), Otherwise, your Kronut won’t fry straight. Transfer half of the punched kronuts to the sheet pan, leaving room for kronuts to “proof.” Brush tops of the Kronut with water and set aside (Pic 2). Place Kronut holes on the same sheet tray, leaving enough space for them to proof without sticking to each other. Leave in a warm area until they have proofed, about 30 min. Once it is proofed (Pic 3) keep it in the refrigerator for 1 hour or in the freezer for 15 minutes before frying. Frying Kronuts Heat canola oil in a pot, about 3 inches high. Test oil with a pinch of flour, if flour foams it is ready for deep frying. Turn heat to low and place Kronuts in oil (Pic 4), 1-2 at a time, in order to avoid overcrowding the pot. Turn and flip Kronuts often so that they brown evenly. Once golden brown throughout, test one to see if it is cooked all the way through (Pic 5). Remove and place on paper towels, Now is a good time to prepare the Glaze Once it is no longer shiny transfer to a container with sugar and cinnamon and toss(I skipped it). Notes Heat oil in medium temperature and fry the kronuts in low temperature otherwise outside become too dark soon and inside won’t cook properly. Gather the left over dough after punching it in to circles, freeze for a while like 15 mins and roll and again cut in to round shapes...repeat till you finish with dough.

Aruna Ravekumar